
Mercedes-Benz Rear Level Sensor Replacement
Reviewed/Verified by:

Check the link rod before you buy a sensor. Mercedes recalled this exact linkage on 2007 to 2009 E-Class wagons under campaign 12V-264: the ball head seizes and breaks, the sensor then reports the car as permanently too low, and the system keeps raising pressure until the ride goes hard. A genuine sensor runs around $241 and the OEM supplier equivalent around $90, but the link that usually fails first costs a fraction of either.
At a Glance
- Applies to: R-Class, ML-Class and GL-Class; the S-Class W221 uses one sensor above the axle.
- Safety: switch off level control or use jack mode if available, and support the car on jack stands.
- Steps: unplug the sensor, unbolt the link (10mm nuts), remove the two mounting bolts, fit the new sensor.
- Check the link rod first; a broken link fakes a sensor fault, and Mercedes recalled exactly this failure on the 2007 to 2009 E-Class wagon.
- Rear sitting wrong but no warning message? That points at the sensor, not a leak.
- Calibrate ride height afterwards. The factory procedure needs a level surface and an inclinometer, not just a scan tool.
This guide provides instructions on changing the rear-level sensor on a Mercedes-Benz. The pictures are from an R-Class (R320, R350, R500, and R63 AMG). The procedure is the same on other models, including the GL-Class and ML-Class. Some models, such as the S-Class W221, only have one sensor above the axle.
How to Replace Mercedes-Benz Rear Level Sensor

What you will need
- Mercedes-Benz R-Class Rear Level Sensor
- Mechanic Toolset
Confirm it is the sensor before you buy one
The single most useful check costs nothing. If the rear is sitting wrong and the cluster is not showing a “too low” warning, suspect the sensor or its link rod rather than a leak. The control module is not warning you because, as far as it can tell, the car is at the correct height. A real air leak takes the car past the warning threshold and the car tells you about it.

🔧 Find out what is actually wrong before you pay someone to guess
Dealer level diagnostics at home with the YOUCANIC UCAN-II Pro.
- ✔ Covers most makes and models, including many luxury brands. Send us your VIN and we will confirm your car before you order
- ✔ Reads every module, not just the engine, so you find the faults a basic reader says are not there
- ✔ Commands the car: test a fan or pump, bleed ABS, retract an electronic parking brake, register a battery
- ✔ No subscriptions. Free lifetime updates, so the price you pay is the whole price
- ✔ Backed by real mechanics in the USA you can email before and after you buy
Featured in The Wall Street Journal
- Sensor reading too high: the system believes the rear is already up and will not raise it.
- Sensor reading too low: the system keeps adding pressure. The result is a harsh, stiff rear end rather than a sagging one, and possibly a rear that sits high.
- Both rear corners down together: on models with a single rear sensor, that points at the sensor rather than at two air springs failing at the same time.
- Rear rises and then settles again: that is a leak, not a sensor.
Each sensor contains two Hall effect elements for redundancy, and the control unit stores a fault when the two signals disagree. That is why a sensor can be reading wrongly without being completely dead, and why a code is worth reading before you order anything.
Mercedes recalled this exact linkage
NHTSA recall 12V-264, Mercedes campaign 2012070006, covers about 3,613 model year 2007 to 2009 E-Class wagons. The connecting rod between the stabiliser bar and the rear level sensor can seize at its ball head and break. The sensor then reports the car as permanently too low, the system keeps raising bellows pressure, and the owner gets what Mercedes described as “uncomfortable and stiff suspension characteristics.”
The dealer remedy was to inspect the linkage, replace it if it did not have a closed ball head, and then check and adjust the rear axle level. Mercedes allowed roughly 1.5 hours. Different chassis to the R, ML and GL covered here, but the failure mode is the same part doing the same thing, and it is the reason this guide tells you to check the link first.
What the codes look like
AIRMATIC uses two different code formats depending on the age of the car, and most lists online mix them together, which is why a code lookup sometimes seems to return nothing.
- Older cars such as W220, W211, W164 and R230: four character C11xx codes. Level sensor faults appear as C1132, C1133 and C1135.
- Newer cars such as W212, W205 and W166: six character codes. A level signal below limit reads C156684 left rear or C156884 right rear.
Procedure
- Jack up the vehicle and secure it with jack stands.
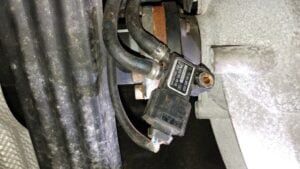
- Locate the rear level sensor mounted above the lower control arm.

- Press the electrical connector, then pull it to unplug it.
- Remove the 10mm nuts, then disconnect the link between the sensor and the lower control arm.
- Remove the two bolts that secure the level sensor.
- Install the new rear-level sensor.


Carrying out vehicle level calibration is strongly recommended to ensure the vehicle reaches the correct height.
Safety on air suspension
If the car has Airmatic air suspension, the system can raise or lower the body when a door opens or the ignition is switched, even while the car is on stands. Switch the ignition off, close the doors, and if your model offers a jack mode or a way to switch off level control, turn it on before lifting. Always rest the car on jack stands under solid body points, never on the jack alone.
Signs the level sensor is the problem
A failing rear level sensor usually shows up as a suspension warning message, or the rear sitting too high or too low. Be careful with “it changes height while parked,” because a healthy AIRMATIC system does trim its own ride height for a period after you walk away, so that on its own is not a fault. The link rod between the sensor and the control arm can also break or pop off its ball joint, which gives a false reading from a perfectly good sensor, so inspect the link before you buy a sensor. Read the codes from the suspension control module first: a sensor fault with an implausible height value confirms it.
Calibrate after replacement
A new sensor does not know the correct ride height until it is calibrated, and the real procedure is more involved than most guides admit. Mercedes specifies a level alignment rack and an inclinometer, because the calibration asks you to enter an inclination angle for each axle, and that value is measured rather than looked up. There is no table of numbers to copy, which is exactly why borrowed figures from forums produce cars that sit wrong.
The sequence matters too. Settle the suspension first by raising it, waiting two minutes, lowering it and waiting two minutes. Measure each corner. Enter the measured angles, fronts as read and rears as negative values. The module accepts the calibration only if the angles, the side to side deviation and the sensor voltages are all within tolerance, and rejects it otherwise. A scan tool that supports Mercedes level control, such as the YOUCANIC UCAN-II Pro on supported models, drives that routine, but the tool is only half the job: without a level surface and a way to measure angle, you cannot complete it to specification.
Skipping calibration leaves the car at the wrong height, which upsets headlight aim and handling, and on a car that already had a broken linkage it can also leave the system fighting itself.
Frequently Asked Questions
Can I drive with a bad rear level sensor?
Usually yes, but the car may sit too high or too low, and the suspension or headlight leveling warnings can stay on. A car sitting very low can damage tires and the air springs, so fix it soon.
Does a new level sensor need calibration?
Yes. The system has to learn the new sensor’s reference height, otherwise the car can settle at the wrong ride height. Calibration is done with a scan tool that supports Mercedes level control.
Is it the sensor or the link rod?
Check the plastic link rod and its ball joints first. A broken or disconnected link makes the sensor read a wrong height and sets the same fault as a failed sensor, for a fraction of the cost.
Which part number do I need?
Order against your VIN rather than against a number from an article. Two numbers circulate for Mercedes level sensors, A0105427617 and A0105427717, and retailers catalogue both under names like “headlight level sensor,” because the same Hall sensor body is used for headlamp range control and for chassis levelling. Published fitment data for the two contradicts itself, and we could not resolve which belongs where from a Mercedes source. For scale, a genuine sensor runs around $241 and the OEM supplier equivalent around $90 at a named US retailer. The link rod is a separate, much cheaper part, and it is the one that usually fails.
Related guides
- Not sure what is wrong yet? Start with the air suspension warning messages explained
- Ride height level sensors, front and rear, in more detail
- Air suspension compressor replacement, and why the leak matters more than the pump
- AIRMATIC control module replacement
Check these troubleshooting and repair guides for more help on your Mercedes-Benz.