

Mitsubishi Outlander Tail Light Replacement
If the brake light goes bad, the whole assembly must be replaced, as repairing the LED bulbs is challenging. This guide provides instructions on removing and replacing the tail light on a 2019 Mitsubishi Outlander. The taillight bulbs are LED and made into the tail light assembly.
Replacing the assembly is cost-effective and simple. It can be done at home quickly and easily with a few basic tools.
What you will need
Tools

🔧 Stop paying the dealer for every warning light
Get dealer level diagnostics at home with the YOUCANIC Full System Scanner.
- ✔ Works with all makes and models, including most luxury brands
- ✔ Topology map view shows all vehicle modules on one screen for faster diagnostics
- ✔ Bi directional controls to test fans, pumps, actuators and more so you do not have to guess
- ✔ Special resets and calibrations such as ABS bleed, EPB service, battery registration and more
- ✔ Free lifetime updates with no recurring fees
- Phillips head screwdriver
Parts
- Mitsubishi Outlander taillight assembly
Procedure
- Firstly, open the trunk so you can see the two screws on the side of the taillight assembly.
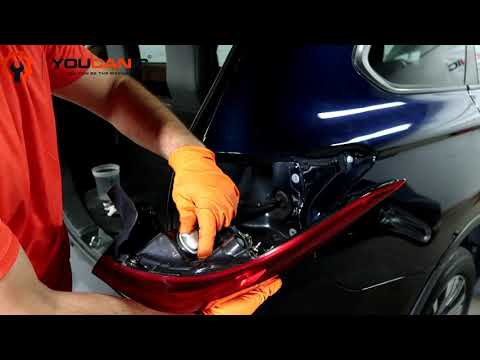
- Remove these two screws from the inside, and pull the taillight assembly off of the vehicle. A little bit of force may be necessary. The tail light is held in by retaining pins that snap out.
- Remove the turn signal bulb connector by pressing the plastic tab and pulling the connector out.
- To remove the electrical connector from the LED brake bulb, the plastic connector attached to the tail light must be twisted counterclockwise and pulled out of the tail light housing. This will expose the male connector that is inside the LED bulb.
- Press the small plastic tab on the back of the connector and pull it out of the LED bulb. Set the tail light assembly aside.
- Now, the wiring for the taillight needs to be removed. Pull the wiring and pry the rubber grommet inside the vehicle body out of its socket.
- Behind the rubber grommet, the wiring connects to a plug. Press the tab and pull the connectors apart.
- Take the new tail light and connect the tail light wiring to the vehicle’s wiring. Make sure it securely plugs in and clicks in place.
- Push the wiring back through the vehicle and insert the rubber grommet into the hole in the body. Make sure this grommet is flush around and sitting in its correct groove.
- Pins and a socket on the back of the taillight must be aligned with the hardware on the body. Ensure the pins go in the holes, the socket goes over the retaining clip, and push the tail light into place.
- Insert the two screws and tighten them with the screwdriver. Make sure the brake light is now working. Repeat on the other side if necessary; you are all done!
I changed my brake lights, but they still aren’t working. What’s wrong?
There are many causes of brake lights going out other than the bulb going bad. Do simple electrical checks to ensure that the light is the problem and not something else. Start by simply checking the brake light fuse with this guide. Verify that the brake switch is functioning properly if the fuses are fine. Check the wiring for power to the lights as part of a deeper diagnosis.
Vehicle Applications
This applies to Mitsubishi Outlander model years: 2012, 2013, 2014, 2015, 2016, 2017, 2018, 2019, and 2020, and includes the Sport model.
We hope you find the Mitsubishi Outlander Tail Light Replacement guide helpful. Check these troubleshooting and repair guides for more help on your Mitsubishi.


