
Mercedes-Benz Front CV Joint Axle Replacement
Reviewed/Verified by:

On a 4MATIC the clicking from a standstill, the vibration at speed and the knock over bumps usually trace back to one thing: a front CV joint whose boot has split and let the grease out. Before starting, check which hub nut your car has, because these models split between a 27 mm hex and a 32 mm bi hex, and soak the bolts in penetrating oil for fifteen to thirty minutes.
At a Glance
- Applies to Mercedes 4Matic models (C, E, S, ML, GL, GLA, GLE, GLS); shown on a 2016 C300 4Matic.
- Symptoms: clicking from a standstill or in turns, vibration, knocking over bumps, grease thrown inside the wheel.
- Torn CV boots are the usual start; catching them early can save the joint.
- Tools: metric sockets, 21mm wrench, 27mm or 32mm axle nut socket, hammer, jack and stands.
- Fit a new axle nut every time and torque it to the service manual figure.
Symptoms
Mercedes CV boots are known to fail quite frequently. If a damaged Mercedes CV boot is not noticed on time, it will cause the CV joint to fail. Replacing a Mercedes CV boot or CV joint requires the removal of the front axle.
- Clicking noise when moving from a standstill
- Grease on the inner tire edge of the wheel well
- Vibrations while driving
- Knocking sound when going over bumps
This guide applies to Mercedes-Benz 4Matic vehicles, including C, E, S, ML, GL, GLA, GLE, and GLS Classes. The pictures shown below are from a 2016 Mercedes-Benz C300 4Matic.

🔧 Find out what is actually wrong before you pay someone to guess
Dealer level diagnostics at home with the YOUCANIC UCAN-II Pro.
- ✔ Covers most makes and models, including many luxury brands. Send us your VIN and we will confirm your car before you order
- ✔ Reads every module, not just the engine, so you find the faults a basic reader says are not there
- ✔ Commands the car: test a fan or pump, bleed ABS, retract an electronic parking brake, register a battery
- ✔ No subscriptions. Free lifetime updates, so the price you pay is the whole price
- ✔ Backed by real mechanics in the USA you can email before and after you buy
Featured in The Wall Street Journal
What will you need?
- Mercedes half shaft
- Mechanic Toolset Metric
- 21mm wrench
- 27mm hex nut socket or 32mm bi-hex socket
- Hammer
- Jack and jack-stand
- Breaker bar
- Pry bar
- Ball joint removal tool
- Penetrating oil
Procedure
How to replace the front CV axle on a Mercedes-Benz.
- Park the vehicle on level ground and apply the parking brake to prevent vehicle movement.
- Break loose the lug nuts but do not remove them yet.

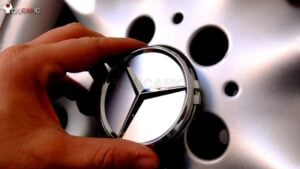
- While the car is still on the ground, remove the center cap with the Mercedes-Benz logo from the wheel. This will expose the center axle shaft bolt. (Shown with the wheel removed.)

- Using a breaker bar and an appropriate socket, break loose and partially unbolt the center axle shaft bolt. Depending on the model, you will need either 27mm hex or 32 bi-hex sockets. You will need a breaker bar and plenty of force for this step.
- Jack up your car and rest it securely on jack stands.
- Unbolt the wheel lugs and remove the wheel.
- Separate the front lower control arm or the upper control arm, depending on the model. You want to disconnect the control arm to allow the steering knuckle to move out. In this case, we disconnected the upper control arm. To separate the control arms, use a ball joint puller to damage the ball joint boot.

- On most models, you will need to detach the stabilizer bar link rod from the stabilizer bar.
- Pull out the hub carrier as far as the CV joint allows. Then tap on the center axle shaft bolt with a hammer. This will break free the CV joint out of the wheel hub. Now you can move the hub carrier out of the way.

- In some cases, you might need to remove the brake caliper to gain better access.
- Remove the lower engine splash shield with several 8mm screws and note the inner CV joint on the front transfer case.

- Tap the inner CV joint out of the transfer box case using a pry bar as an extension tool and a hammer.

- Visually check for traces of oil on the transfer case. If there are any, you will need to replace the shaft seal.
- Clean the splines in the transfer box case and the hub carrier with a brake cleaner. Also, if suspension parts have traces of grease, clean them out.
- Slide in a new half shaft, and push the inner joint into the transfer box case. You might need to wiggle it around until it snaps in. Make sure it is all the way in.


Constant velocity joints, also known as CV joints, transfer case to the wheels. On a Mercedes-Benz with rear-wheel drive, you won’t have a CV joint unless you have a 4Matic Mercedes-Benz.
Notes
- If you can’t break loose the center axle bolt, remember that you need to turn the bolt counterclockwise to remove it.
- Removing the axle bolt while the wheel is off is not recommended, as this can put too much strain on the transmission and transfer case.
- Suspension parts are exposed to dirt, salt, water, and other contaminants. This means that bolts that hold them together might be corroded and extremely heavy to unbolt. It is good to spray them with penetrating oil and leave them for 15 to 30 minutes before trying to unlock them.
- While working on the suspension, visually check all parts. Ball joints have rubber boots for protection. As with CV rubber boots, the ball joint must be replaced if the rubber boots are damaged.
- Most CV joints should have a retaining ring at the end of the inner CV joint spline.
- You will need to rotate the half shaft until the tabs on the case align with grooves on the retaining rings. Usually, there are no markings, so you have to try until you get it right.
- You must remove the CV joint if you have a cracked Mercedes CV boot. Use the instructions in this guide to remove the CV joint. Then separate the CV joint from the axle to replace the CV boot.
- Most models are more practical and change the whole half shaft, making it faster and easier. And it is cheaper, as buying CV joints and new Mercedes CV boots separately.
Additional Resources
- 4Matic CV boot replacement PICTORIAL
- W221 4matic Front Axle Bolt Torque Spec
- Mercedes-Benz W211 E-Class Front Axle Shaft Replacement
- Remove/install front axle shafts.pdf
- Mercedes C-Class CV Boot Replacement DIY (Video)
- DIY Front Inner Passenger Side CV Boot Replacement
Catch a torn boot before the joint is ruined
The joint itself rarely fails first. What fails is the rubber boot, and once it splits the grease flings out and road grit and water get in, which destroys the joint within a few thousand miles. A split boot caught early can be replaced on its own for a fraction of the cost of an axle. Look for a ring of dark grease thrown around the inside of the wheel arch, which is the first visible sign, and check both boots whenever the car is on a lift for anything else.
Clicking on turns means the outer joint
The symptoms point at which end has failed. A rhythmic clicking that appears when turning at low speed, worse on full lock, is the outer joint. A vibration or shudder felt under acceleration that smooths off when you lift is usually the inner joint. A clunk when taking up drive can be either, but it can also be a worn gearbox mount or differential bush, so confirm before ordering parts.
Torque the hub nut correctly and use a new one
The axle nut is a stretch fastener and is not reusable. Fit a new one each time and tighten it to the specified torque, because it sets the preload on the wheel bearing. Too loose destroys the bearing in short order, too tight does the same thing faster. Do not let the car’s weight rest on the wheel before the axle nut is tightened, because that can damage the wheel bearing. Snug the nut with a helper holding the brake, then do the final torque exactly as the service manual describes.
If a warning light appears after the job
ABS, ESP and 4Matic lights appearing after an axle replacement are almost always the wheel speed sensor, which sits right in the work area and is easy to unseat, dirty or damage. Rather than guessing which corner, read the stored code and it will name the wheel. A scan tool that reaches the ABS and ESP modules rather than just the engine, such as the YOUCANIC UCAN-II Pro, will tell you in seconds and let you clear the code once the sensor is reseated.
Frequently Asked Questions
What is the Center axle bolt tightening torque?
Torque values vary by model and year, so take the figure from the service manual for your exact car.
What is the Axle bolt socket size?
In most cases, you will need a 27mm hex nut socket. However, some models might have a larger 32mm nut so that you will need a 32mm bi-hex socket.
What is the easiest way to diagnose a bad CV joint?
Find an empty parking lot with enough place to drive in circles safely. While standing still, turn the wheel to one side. Put your car into gear and accelerate fast. Listen for loud clicking noises, then do the same driving in reverse.
How can I prevent CV joints from failing?
CV joints are lubricated by grease and have rubber boots that protect them from dirt and debris. When the rubber boot cracks or tears open, grease will be forced out of the CV joint while driving. This will leave the CV joint without proper lubrication. To make things worse, dirt and other contaminants will only speed up the wear process.
Can I drive my Mercedes with a bad CV joint?
Driving around long time with a badly worn CV joint is unsafe. In extreme cases, it can break without any prior warning signs. If this happens while driving or accelerating, it might severely damage suspension components.
Still, this doesn’t mean you must stop using your car at once. You can drive it shorter if you adjust your driving style. Avoid hard acceleration and be extra gentle with the throttle when turning. Replace the bad CV joint as soon as possible.
Are the traces of oil on the transfer case caused by a bad CV joint?
If you see traces of oil on your transfer case, a shaft seal is bad. You will need to replace it before installing a new half-shaft.