

2015 GMC Yukon Denali AC Not Cooling? How We Quickly Diagnosed & Fixed It
Contributed by:
Customer Complaint
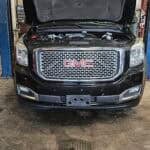
A customer brought in their 2015 GMC Yukon Denali with a 6.2L engine, reporting that the air conditioning wasn’t blowing cold air. They had already tried basic checks but couldn’t figure out the issue. With summer temperatures rising, they needed the system diagnosed and fixed quickly.
Diagnosis
I test-drove the vehicle and noticed there was no cold air coming from the vents when the AC was on with the temperature set to full cold, air delivery set to the vent position, and the blower motor on full high vent temperature, which reads 75 degrees. I installed the AC service machine/manifold gauge set and checked the system’s static pressures.

The manifold gauges pointed to a drained AC system. If the system had a charge, we would have seen a static pressure around ambient air temperature. For example, if the ambient temperature was 70 degrees, both the high and low side static pressures would read around 70 psi.

🔧 Stop paying the dealer for every warning light
Get dealer level diagnostics at home with the YOUCANIC Full System Scanner.
- ✔ Works with all makes and models, including most luxury brands
- ✔ Topology map view shows all vehicle modules on one screen for faster diagnostics
- ✔ Bi directional controls to test fans, pumps, actuators and more so you do not have to guess
- ✔ Special resets and calibrations such as ABS bleed, EPB service, battery registration and more
- ✔ Free lifetime updates with no recurring fees
Next, we inspected the AC system with a UV light, looking for evidence of leak trace dye. Upon inspection, we noticed a leak at the top left driver-side condenser where the condenser core meets the tanks.

At this point, we have established that the condenser is cracked and leaking, resulting in a loss of system charge. To replace the condenser in this vehicle, the front bumper cover and headlamps had to be removed.

With the new condenser installed, we again installed the AC service machine and pulled a vacuum on the AC system to 29″ Hg. The vacuum on the system boils moisture out of the system that may have entered when the system was opened. Once 29″ Hg is achieved, we monitored the vacuum for a period of 10 minutes and watched for decay. If there is decay, it indicates a leak, and further diagnosis will be needed. In our case, the system held 29″ of vacuum for 10 minutes. At this point, the system is ready for a charge. We charged the system to the proper level indicated by the manufacturer, which is located on the sticker.

With the system fully charged, we installed the bumper cover and headlamps, checked the operation of the AC system, and found that our vent temperature was 45 degrees set to the full cold vent position.

AC System Diagnostic & Repair Summary
- Test-drove vehicle and confirmed no cold air from vents with AC on, temp set to full cold, and blower on high
- Measured vent temperature at 75°F
- Installed AC manifold gauge set — confirmed system had no static pressure, indicating an empty system
- Noted that a charged system should show static pressures around ambient temperature (e.g., ~70 psi at 70°F)
- Inspected AC system with UV light — found a leak at driver-side top corner of condenser, where the core meets the tank
- We determined the condenser was cracked and leaking, leading to a complete loss of refrigerant
- Informed the customer that the front bumper cover and headlamps must be removed to access and replace the condenser
- Replaced the condenser and connected the AC service machine to pull a vacuum to 29″ Hg
- Monitored vacuum for 10 minutes — no decay observed, indicating no further leaks
- Recharged system to manufacturer-specified level using data on underhood AC label
- Reassembled bumper cover and headlamps
- Verified proper AC operation and confirmed cold air blowing from vents


