BMW N46 crankshaft sensor and CCV replacement
Is your BMW crankshaft sensor and CCV damaged? Learn how to replace them by following the procedures below. This article will cover replacing two parts, a crankshaft sensor and a crankcase ventilation system, as both require identical steps. Due to the amount of work needed, I would recommend replacing the crankcase ventilation as a preventive measure if replacing the crankcase sensor.
Faulty Crankshaft Sensor Symptoms
The crankshaft sensor is the most vital of all sensors in your car, as it gives information about the crankshaft and piston’s position. When it fails, the engine in your car will be dead and will not start at all. The crankshaft sensor will often show intermittent symptoms before it fails. The most obvious signs are sporadic cranking without a start.
When that happens, a crankcase sensor-related code will be stored DTM code in the vehicle’s memory. However, on N46 engines, it is possible to have had other symptoms during the initial sensor failing phase. One is a periodic engine cutting out, just like missing a beat. An alternator error will sometimes follow this. In some cases, it is also possible to have Vanos-related issues.
When replacing the crankshaft sensor, get an OEM one from the dealer. Pattern sensors, even those from reputable manufacturers, seem to have had a high failure rate.
Crankcase Ventilation System Problems
BMW has a complex crankcase ventilation system called CCV, designed to lower emissions and oil consumption. To achieve this, it uses a cyclone separator in which oil vapors get splattered against the walls. As a result, the oil condenses and drips back down into the oil pan. In addition, there is a diaphragm regulating the amount of vacuum in the CCV, as an excessive intake vacuum would suck too much oil.
However, this system has several failure points. One is hoses, which become brittle and break, causing intake leaks. Another is a clogged cyclone separator that doesn’t remove oil particles from the vapor. The diaphragm can break, allowing a full intake vacuum in the CCV system. When replacing, always renew the valve itself and all three hoses.
Repair Procedure
- Disconnect the negative battery lead.
- Choke both rear wheels and raise the front driver side in the air. Place the jack stands in a suitable place and have the car resting securely on it.
- Remove the front engine splash tray, held in place by 12 screws.
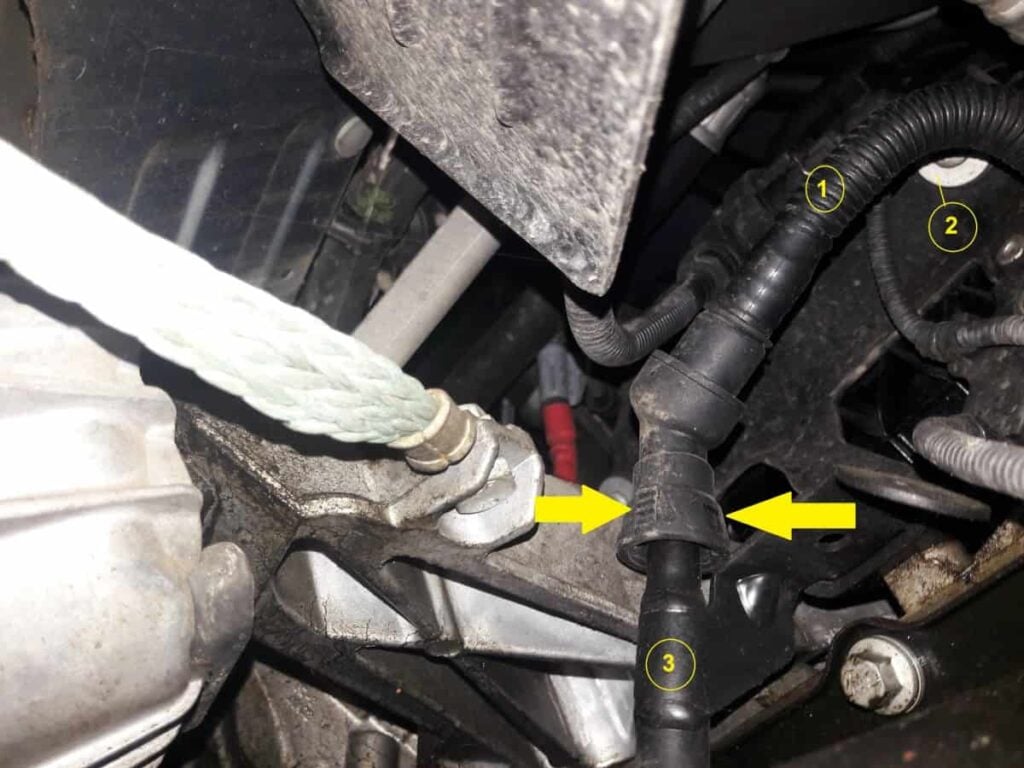
- Slide underneath the car between the front driver’s wheel and the door. At the driver’s side of the oil pan, find the oil return pipe (see item 1 on the image below) that goes into the oil pan (3) and a Torx bolt that holds the intake manifold to the retaining bracket (2). Press the sides (arrows show where to press) of the oil return line retaining clip and pull off the return line. Remove the Torx bolt that holds the intake manifold. You may need a wobbly extension to get some extra freedom when trying to reach this bolt.
- Go back into the engine bay and slide out both wiring and the positive lead harneses attached to the scuttle drain. Remove cabin filter housing and two cover caps at each side before removing the scuttle drain.

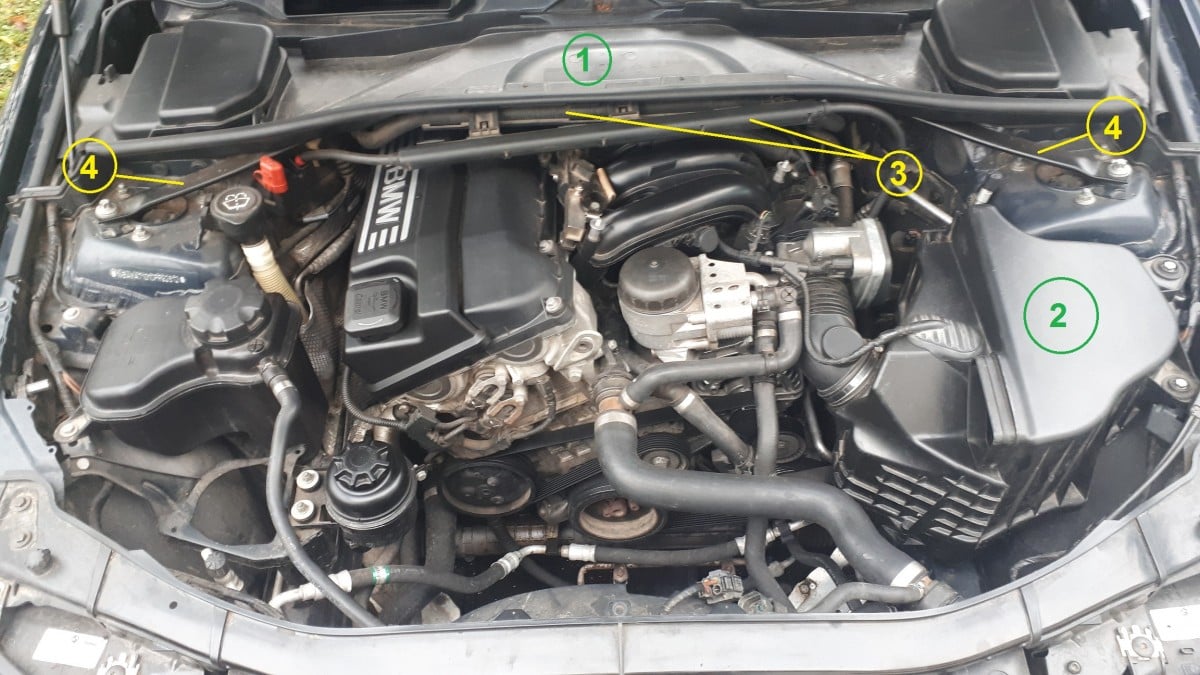
- Remove both suspension strut bars (item 4 on the image below).
- Most models have an acoustic cover covering the intake manifold and fuel injectors. If there is one, remove it.
- Disconnect the MAF sensor and remove the intake duct and air filter box (item 2 in the image below). Make sure to securely store the air filter box to prevent eventual MAF damage. To get an idea where the other Torx bolt is located, slide your hand between the throttle body and alternator and try to feel it. Use a small ratchet to undo this bolt, as space is limited. If necessary, remove the throttle body to get some extra room. With that bolt removed, you have done all the tricky parts.

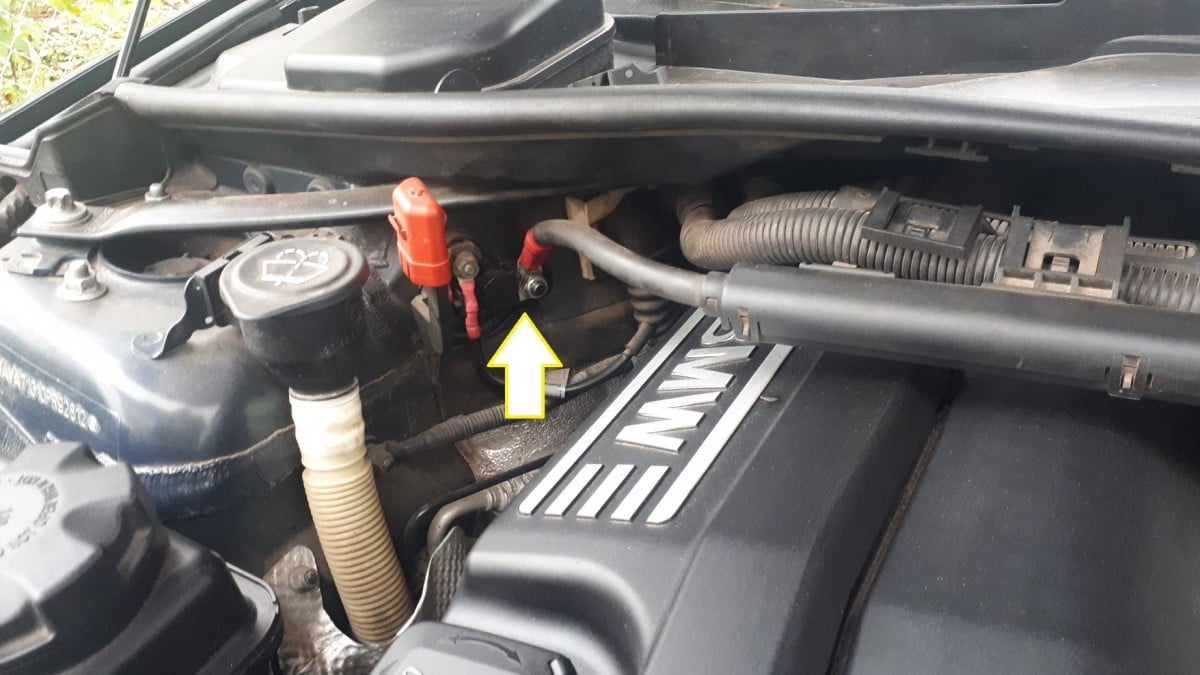
- The positive battery lead is bolted down to the chassis terminal on the passenger side. Disconnect the lead and move it out of the way (shown with the arrow on the image below, with the plastic cover cap removed).

- Disconnect all the wiring and hoses that are connected to the intake manifold. There are rubber brackets at the backside of the intake manifold that holds the wiring harness. Work patiently and methodically and try to remember how everything is arranged. If necessary, take photos or make notes that will help you later refit.
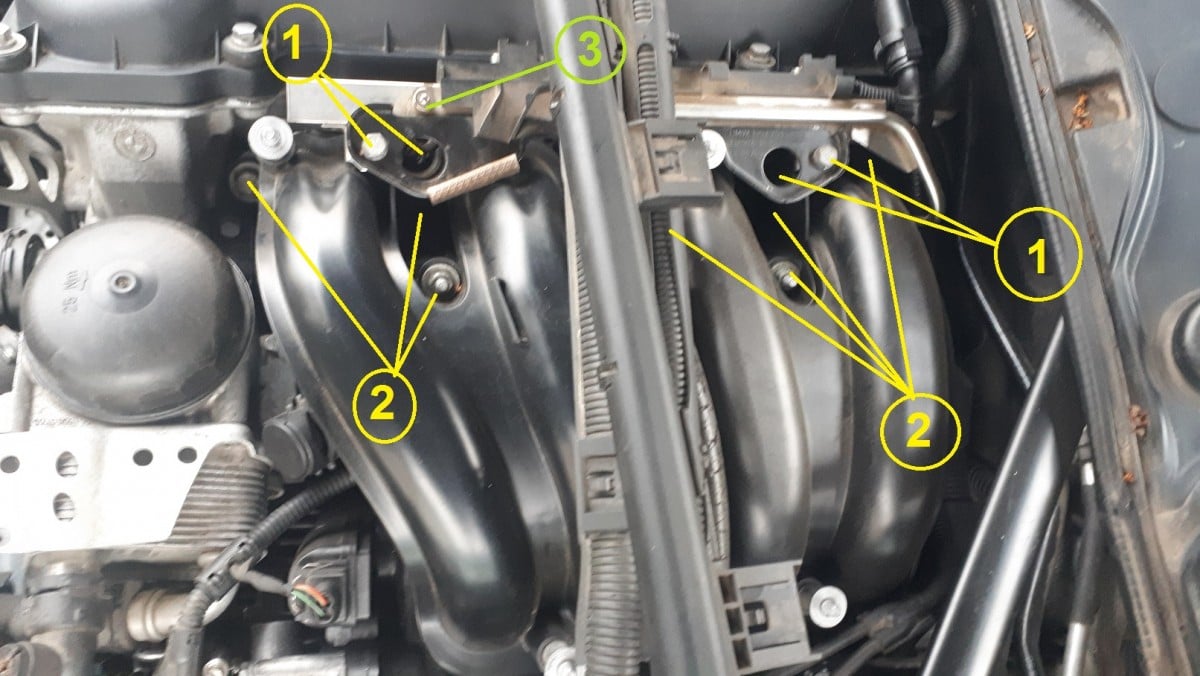
- There is a valve ((item 3 on the image below) at the top of the fuel rail, which you will use to release pressurized fuel. Disconnect the fuel rail from the fuel hose by undoing the connector. Depending on the model, this connector will be either above the intake manifold at the fuel rail entrance or at the back of the engine. This is a press-type connector, meaning you must push in the blue tabs and pull hoses apart to release them.
- The fuel rail is held in place by two bolts and a retaining bracket. Undo two M10 bolts (item 1 on the image below) that hold the fuel rail retaining bracket and remove the bracket itself. After that, remove two M10 bolts that hold the fuel rail and gently pry out the fuel rail with injection. You might need to wiggle it from several angles until all injectors are free.
- The intake manifold has two M10 nuts and six M13 bolts (item 2 on the image below). Remove all nuts and bolts and start gently wiggling out the manifold. There are two tabs underneath the manifold that holds it secured to the backing plate, so take extra care to set it free. As the intake manifold is oddly shaped, it will take some maneuvering to get it out. Take your time and work patiently.

- The crankcase ventilation valve is bolted to the backing plate with three Torx screws. It has three hoses coming out: one that comes from the valve cover (see arrow 1 on the image below), an oil return pipe that goes down to the oil pan (2), and a vacuum pipe (arrow 3) that goes to the intake manifold. Undo all the hoses, unscrew the bolts and remove the valve.

- Replacing the crankshaft sensor is a simple job. It is located just underneath the starter, secured with one bolt. Unplug the connector, undo the bolt, and pull out the sensor. This may require some wiggling. When installing a new one, renew the sealing ring and use a new bolt. Alternatively, you can use a small locking compound on the old one. Tip: The arrow shows where those tricky Torx bolts from the beginning of this guide go through.

- Replacing the CCV valve and all three tubes leads to routing everything correctly. However, there is a tricky part, as all tubes have quick-connect endings. They are designed to snap on for a snug and air-tight fitment. In most cases, it can be difficult to get them fitted securely, especially in tight and awkward spaces. To help yourself, snap all these connectors on and off several times. This will work them into place and get the o-rings shaped to seating where they go. In addition, you may put some silicone paste on the o-rings, making them slide on much easier.
We hope you find the BMW N46 crankshaft sensor and CCV replacement guide helpful. Check these troubleshooting and repair guides for more help on your BMW.


