

Ford Fusion Replace Rear Brake Pads & Rotors DIY
Would you like to learn how to replace your Ford Fusion rear brake pads and rotor? Because when you apply the brakes, they feel soft and weak. This guide is a step-by-step procedure for replacing the rear brake pads and rotor on a Ford Fusion 2013-2020
Guidelines for Rear Brake Pads & Rotors Replacement on Ford Fusion
What you will need
- Floor jack
- Jack stands
- Power Handle or a breaker bar
- 7mm Allen wrench
- 15mm wrench
- Brake retractor tool
- Hammer
- Flat screwdriver
- Ford Fusion rear brake pads
- Ford Fusion rear rotor
Procedure
- Park the vehicle on a flat-level ground surface.

- Set the vehicle in service mode. See the step-by-step process on how to set the vehicle to service mode.


3. Loosen the lug nuts on the rear wheel using a breaker bar.
4. Jack up the vehicle’s rear and support the car with jack stands.

🔧 Stop paying the dealer for every warning light
Get dealer level diagnostics at home with the YOUCANIC Full System Scanner.
- ✔ Works with all makes and models, including most luxury brands
- ✔ Topology map view shows all vehicle modules on one screen for faster diagnostics
- ✔ Bi directional controls to test fans, pumps, actuators and more so you do not have to guess
- ✔ Special resets and calibrations such as ABS bleed, EPB service, battery registration and more
- ✔ Free lifetime updates with no recurring fees
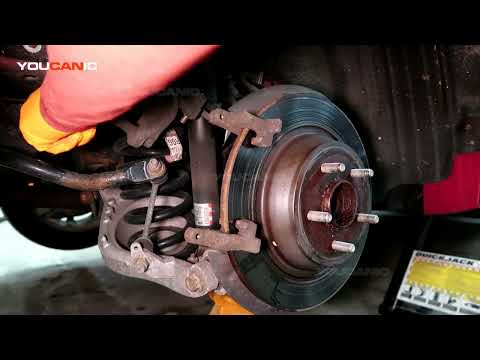
5. Remove the rear wheel by removing the lug nuts and pulling the wheel out.
6. Remove the metal clip on the brake caliper using a flat screwdriver by popping it out.
7. Loosen the top and bottom guide pins behind the brake caliper using a 7mm Allen wrench.

8. Pull the piston caliper out away from the carrier.
9. Remove the brake pads from the caliper. If the brake pad does not come out easily, pry them out using a flat screwdriver.
10. Press the piston back using a retractor tool.
11. Use a 15mm wrench to loosen the bolts and remove them behind the bracket.

12. Separate the carrier bracket out from the vehicle.
13. Remove the rotor by pulling it out. If the rotor does not come off easily, use a hammer to get it out. Penetrating fluid can help make this process more manageable if the rotor is rusted. 

14. Clean the brake caliper and rotor’s installation port using a wire brush.
15. Install the new rotor on the vehicle.
16. Put the carrier bracket back into the rotor and reinstall the 15mm bolts of the carrier.
17. Confirm the orientation of brake pads into the caliper and push them in place.
18. Reposition the piston caliper back into the rotor, then tighten the guide pins to lock the caliper.

19. Line up the metal clip back to the caliper and press it in to set it into place.
20. Reinstall the wheel back in the vehicle and tighten the lug nuts.
21. Pump the brake pedal.
22. Set the parking brake out of maintenance mode.
Torque Specifications
- Caliper mounting bracket bolts
- Front 2013 and later: 111 ft lbs
- Rear 2013 and later: 66 ft lbs
- Caliper mounting bolts (these go into the guide pins)
- Front 2013 and later: 22 ft lbs
- Rear 2013 and later: 21 ft lbs
- Lug nuts
- 100 ft-lbs (135 N·m)
We hope you find the Ford Fusion Replace Rear Brake Pads & Rotors DIY guide helpful. Check these troubleshooting and repair guides for more help on your Ford.


 Circuit High Air Flow &Amp; Voltage Output 21")
