

Mercedes Benz S400 Power Electronic Module Replacement Guide
Need to replace the Power Electronic Module of your Mercedes-Benz? Learn how to replace the power electronic module of your Mercedes-Benz by following the procedures below.
This automotive repair guide will tackle replacing the power electronic module on a Mercedes-Benz S-Class. The repair consists of removing parts of the exhaust system to access the module and removing the electrical connectors and the module itself. The parts for this repair will include a new module, and some specialty tools may be required.
Disclaimer: These instructions are for information purposes only.

🔧 Stop paying the dealer for every warning light
Get dealer level diagnostics at home with the YOUCANIC Full System Scanner.
- ✔ Works with all makes and models, including most luxury brands
- ✔ Topology map view shows all vehicle modules on one screen for faster diagnostics
- ✔ Bi directional controls to test fans, pumps, actuators and more so you do not have to guess
- ✔ Special resets and calibrations such as ABS bleed, EPB service, battery registration and more
- ✔ Free lifetime updates with no recurring fees
Parts
Tools
- Automotive lift or jack and jack stands.
- Ratchet wrench
- Drive socket extensions.
- 10mm, 13 mm Sockets
- Flexible ratcheting wrench (7mm).
- Screwdriver
- Rubber electrical insulated gloves.
- Pliers
- Hex bit and driver
- Torx bits

The YOUCANIC Full System Scanner can read and clear fault codes through every vehicle’s control module.
Procedure
- Use a professional diagnostic scanner, like the YOUCANIC Full System Scanner, to disable the high-voltage battery. Select Control Units, then Battery Management System (BMS). Under the BMS unit, you will find the option to disable the high-voltage battery.
- Disconnect the battery’s negative terminal in the trunk using a 10mm socket.
- Remove the hybrid battery cover on the top left of the engine bay by the windshield cowl, exposing the hybrid battery.
- Make sure to wear rubber electrical insulated gloves when repairing a high-voltage system. Disconnect the electrical connector from the hybrid battery.
- Use a ratchet and a 10mm socket to unbolt the orange high-voltage cable. Unplug the high-voltage cable from the hybrid battery. Set it aside and ensure it doesn’t come in contact with the battery. Lock or cover the contacts on the high-voltage battery.

- Disconnect the O2 sensor electrical connectors.
- Remove the upper 13mm bolt on the exhaust header flange.
- Use a ratchet, extensions, and a 13mm socket to unbolt the lower bolt that secures the catalytic converter to the exhaust header flange. Use a 10mm ratchet and socket to unbolt the bracket mounted to the vehicle.

- Unbolt the clamp around the exhaust pipe and slide it over the joint.
- Remove the two 10mm nuts and brackets at the middle of the pipe.
- Pry the rubber exhaust hanger off the attached hanger and work the piece of exhaust out from under the vehicle. Set it aside.
- With a 7mm flexible ratcheting wrench, unbolt the three bolts holding the heat shield around the exhaust headers. There are a couple of heat shields that need to be removed. The easiest way to remove the bolts that hold these shields is to use a flexible ratcheting wrench.A couple of the bolts are easier to remove from above the engine. Remove the heat shields.
- For safety, remember to wear insulating gloves, locate the hybrid converter control module, and remove the interlock circuit breaker with a hex bit on a driver.
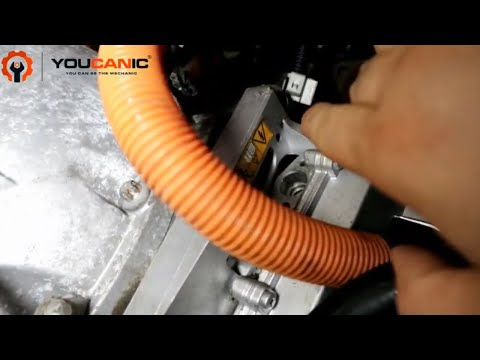
- Remove the cooling hoses from the module with a pair of pliers and plug the hose with a bolt, extension, or plug to prevent the coolant from leaking. Note that you will lose a small amount of coolant. Draining the coolant is not necessary. Bend the hose before removal to minimize coolant loss. Then, plug the end of the hose and continue removing the power electronic module. Two hoses need to be disconnected. One is the inlet, and the other is the outlet hose. The power electronic inverter uses an engine coolant to cool down.
- Remove the lower 13mm bolt for the engine mount on the passenger side. Place a block of wood under the engine and raise the engine about two inches. This will allow you to disconnect the power electronic module and slide it out. Do not raise the engine too high, or you risk causing damage.
- Unbolt the cooling hose elbow from the bottom of the module with a Torx bit and remove it to access the bolts holding the electrical connectors.
- Unbolt the electrical connectors from the module and get them out of the way.
- You will now have access to the four bolts holding the converter module on the motor. Use a 13mm socket and ratchet to remove the four bolts from the module. Two can be accessed from the top, and two from the bottom. One of the bolts will also hold the ground wire to the module.
- Pull the module down and unbolt the two 10mm nuts connecting the high-voltage cable to it. Then, pull the clip from the high-voltage connector and unplug the cable from the module.
- Work the module down and out of the vehicle and remove it.
- Follow the procedure in reverse order to replace it with a new hybrid voltage converter control module.


 A couple of the bolts are easier to remove from above the engine. Remove the heat shields.


Always use proper PPE when working on a hybrid vehicle. Follow proper service procedures and safety regulations when working on electric vehicles. Proper hybrid automotive electrical training is important, and disregarding the safety precautions of working on a high-voltage system can lead to shock, injury, and death.
My hybrid warning light is still on. What do I do?
A professional OBDII scan tool will be needed to access the hybrid modules to clear the diagnostic trouble codes on the vehicle’s computer. Alternatively, the vehicle can be taken to the dealer, and for a fee, the computer will be reset and codes cleared.
Additional Pictures


We hope you find the Mercedes Benz S400 Power Electronic Module Replacement Guide helpful. Check these troubleshooting and repair guides for more help on your Mercedes-Benz.


Feel free to use the contact us form or simply send email to: support at youcanic.
Hi, and thank you for all this info, where can I send this part to repair?